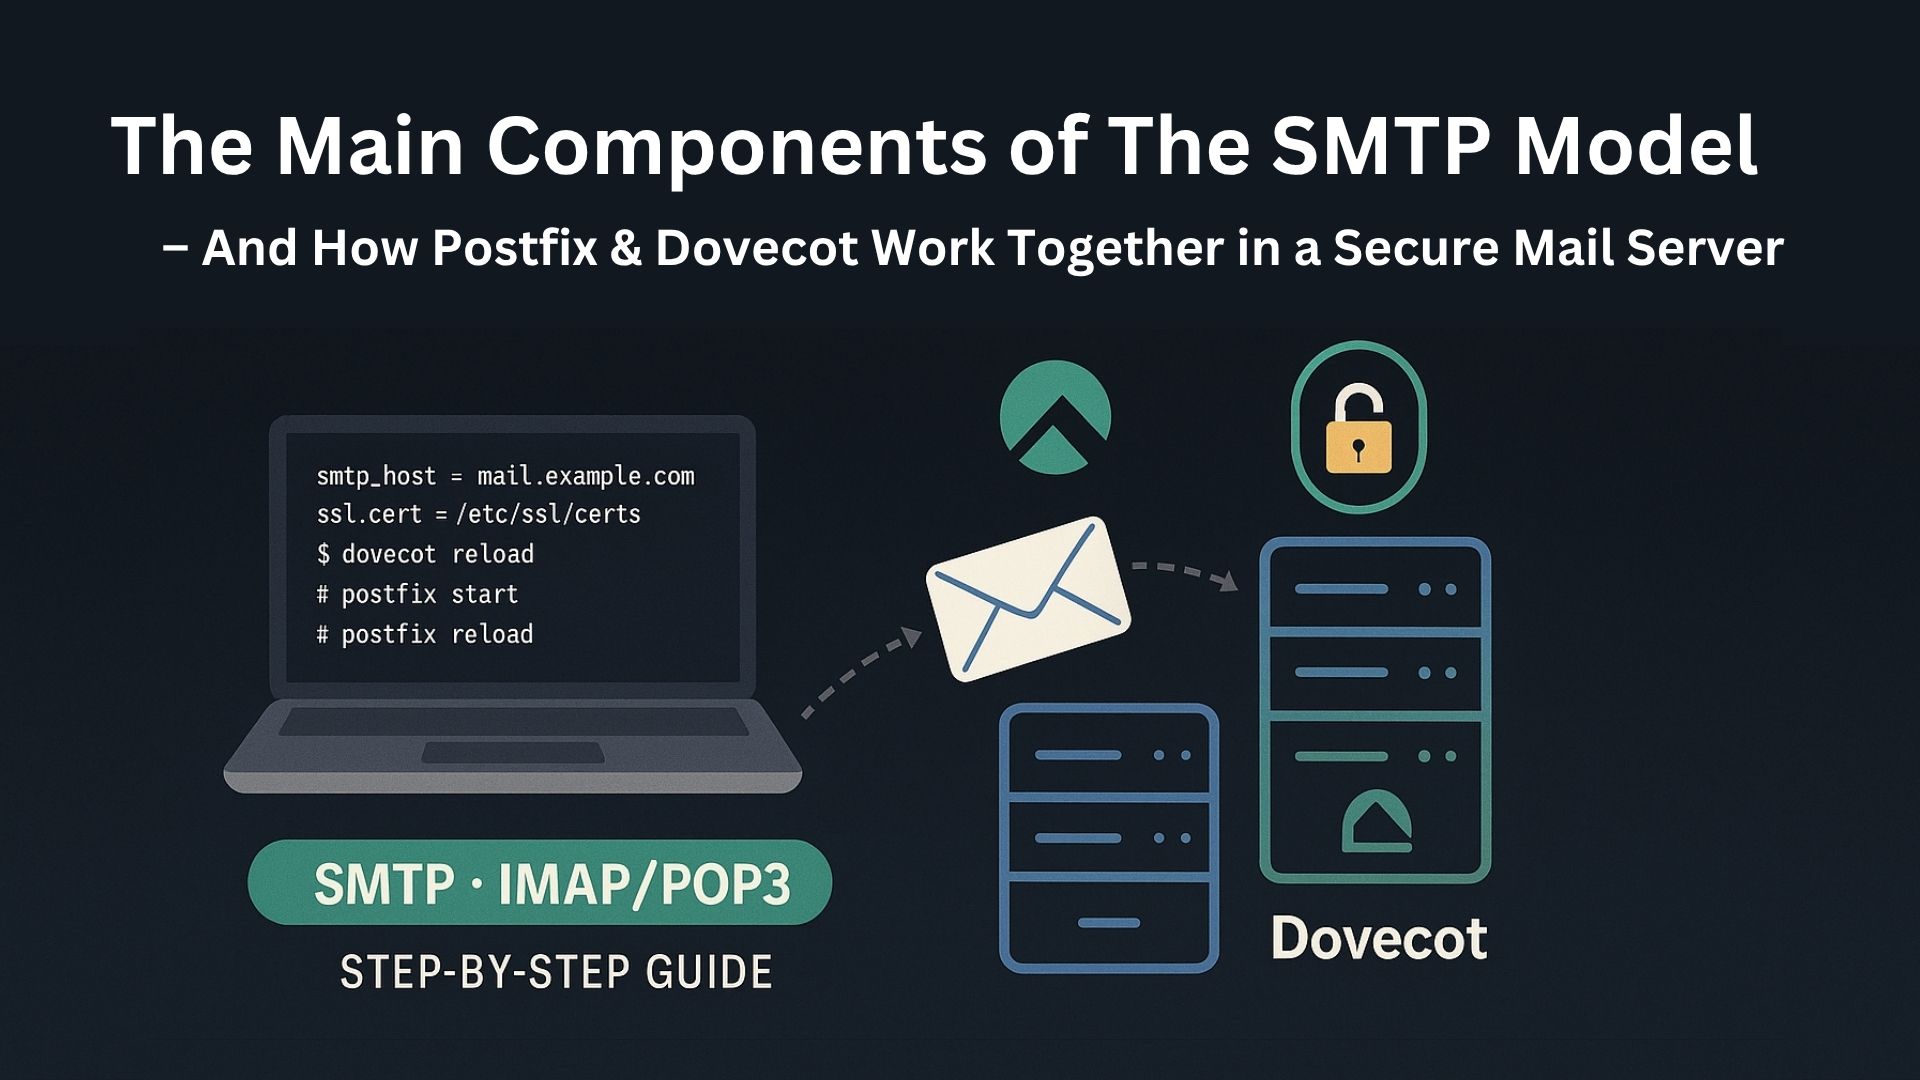
This project focuses on the deployment of a secure and fully functional email server using Rocky Linux within a VirtualBox environment. Acting as the system administrator, I am responsible for setting up and configuring all essential components to enable users to send and receive emails reliably through third-party applications such as Mozilla Thunderbird.
The setup begins with ensuring proper network configuration, which is critical for connectivity and accessibility. The core of the mail system involves installing and configuring Postfix as the Mail Transfer Agent (MTA) for handling outgoing emails, and Dovecot as the IMAP/POP3 server for managing incoming mail services.
Security is a major priority in this deployment. SSL/TLS encryption will be implemented for both Postfix and Dovecot to protect email communication from potential threats and eavesdropping. This ensures that all email transmissions and retrievals occur over secure channels. Once the configuration is complete, the system will be tested by sending and receiving emails between local users, with a focus on verifying secure communication and full functionality.
1.0 Postfix Installation & Configurations
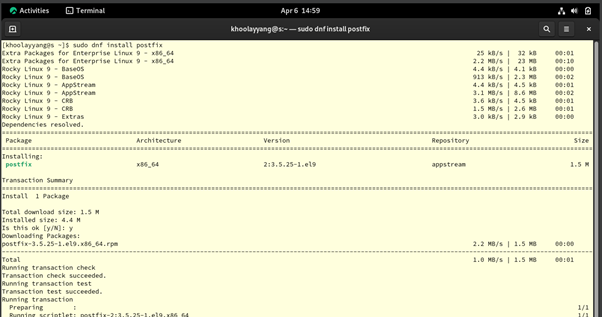
Figure 3.0.1 – Installing the Posting on Rocky OS (Email Server)
First, we will start installing Postfix on the Rocky OS, which is the Email Server. To install Postfix, we need to open the Terminal on Rocky OS and then run the command “sudo dnf install postfix”. You would need to key in the root password to gain access for the installations.

Figure 3.0.2 – Configuring Hostname, My Domain, My Origin, the Postfix main.cf files on the Rocky Linux (Email Server)
Next, I will start to configure the SMTP-Auth setting in Postfix. Before we start, we need to use the command “sudo nano /etc/postfix/main.cf”, it would requires you to fill in your root access password. This command is used to open the postfix “main.cf” file in the nano editor on your terminal. You can now use the up, down, left, right and the enter key on your keyboard to move around in the nano editor to edit the text in it. First, let’s set up our own Fully Qualified Domain Name (FQDN) for our mail by adding “myhostname = mail.s.dklyrocky.com”, then specify our domain name in line 101 by adding “mydomain = s.dklyrocky.com” and “myorigin = $mydomain”.

Figure 3.0.4 – Configuring Mydestination the Postfix main.cf files on the Rocky Linux
After that, move to line 185 in the Postfix main.cf file and change “mydestination = $myhostname, localhost.$mydomain, localhost” to “mydestination = $myhostname, localhost.$mydomain, localhost, $mydomain”. The mydestination parameter will tell the Postfix which domain name it should be consider delivered locally than sending to other places.

Figure 3.0.5 – Configuring Network interface & protocol on the Postfix main.cf files on the Rocky Linux (Email Server)
In the Postfix main.cf, move to lines 135, set the inet_interface to all, and then on line 138 change the int_protocols to IPv4 only.

Figure 3.0.6 – Configuring My Networks on the Postfix main.cf files on the Rocky Linux
On line 285 in the Postfix main.cf file, configure the “mynetworks” with the range of IP addresses of trusted clients, which tells the Postfix server to allow these IP addresses to send emails.

Figure 3.0.7 – Configuring Mail Box Home Directory on the Postfix main.cf files on the Rocky Linux
On line 440 in the Postfix main.cf file, configure the “home_mailbox” to “Maildir/”. This is to let Postfix to transfer the incoming email into the Maildir style to each user's home directory. The “Maildir/” means each email will be store into a separated files with the structure as below:
|
~/Maildir/ ├── cur/ ├── new/ └── tmp/ |
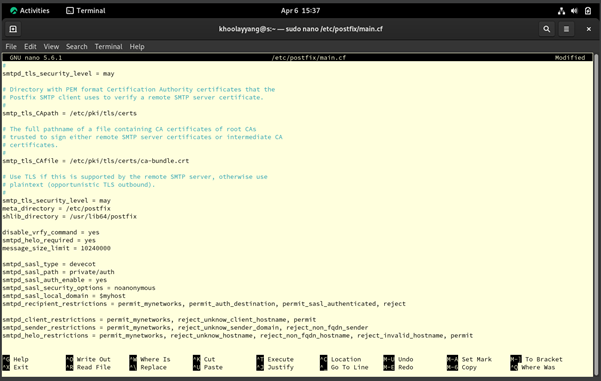
Figure 3.0.8 – Configuring SMTPD on the Postfix main.cf files on the Rocky Linux
Then, move the bottom of the Postfix main.cf file and add these security configs below:
1) “smtpd_banner = $myhostname ESMTP”. This means that it will hide the version of the SMTP software used.
2) “disable_vrfy_command = yes’. This means that I had disabled the SMTP so that they can't verify a specific email address or username exists. This is to prevent the attackers from finding a valid username or the emails on our email server. Meanwhile also prevents us from becoming a target of spam or brute force attacks.
3) “smtpd_helo_required = yes”. This is to tell the clients to send “HELO” or “ELO” command to the server before sending the mail commands. This is to reduce spammers and bot traffic to our servers.
4) “message_size_limit = 10240000”. I had also set a limit of the email size for the entire email to 10 MB. For Google, they set an email size max as 25 MB.
After that, we will now configure the SMTP Authentication Setup with the configuration below with Dovecot:
1) “smtpd_sasl_type = dovecot”. This is to set Devecot as our Authentications.
2) “smtpd_sasl_path = private/auth”. This is the path of the Devecot SASL auth requststs in “/etc/dovecot/conf.d/10-master.conf”.
3) “smtpd_sasl_auth_enable = yes”, This is used to enable the SMTP auth.
4) “smtpd_sasl_security_options = noanonymous” This is to not allow any anonymous authentication.
5) “smtpd_sasl_local_domain = $myhostname”, this is to set set up my domain as the identity lookup.
6) “smtpd_recipient_restrictions = permit_mynetworks, permit_auth_destination, permit_sasl_authenticated, reject” This is a important configuration used to controls the email can be send to who only.
7) “smtpd_helo_restrictions = permit_mynetworks, reject_unknown_hostname, reject_non_fqdn_hostname, reject_invalid_hostname, permit”
8) “smtpd_sender_restrictions = permit_mynetworks, reject_unknown_sender_domain, reject_non_fqdn_sender”
9) “smtpd_client_restrictions = permit_mynetworks, reject_unknown_client_hostname, permit”
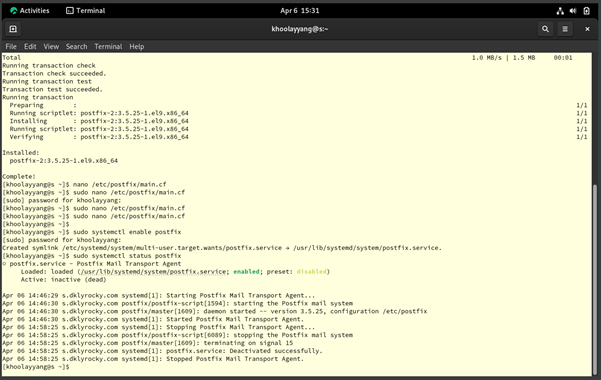
Figure 3.0.9 – Enable Postfix automatically on the Rocky Linux (Email Server)
I will use “sudo systemctl enable --now postfix” to set the postfix will automatically start itself after rebooting the server or starting the server. Then, use to check the health of the Postfix by using “sudo systemctl status postfix”.
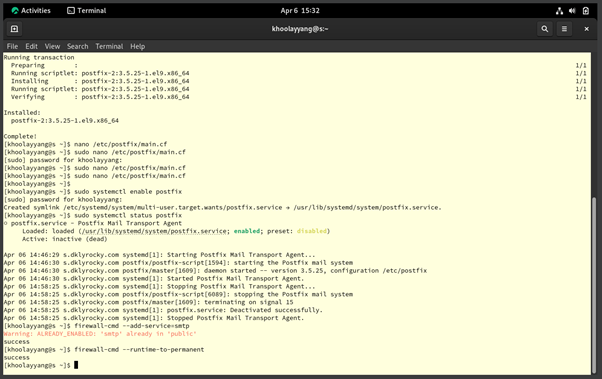
Figure 3.0.10 – Allow port SMTP on the Rocky Linux (Email Server)
Last, we need to use the command “sudo firewall-cmd --add-service=smtp” on the terminal to allow the SMTP to use the port 25 and set it as permanent by using the command “firewall-cmd --runtime-to-permanent” and restart the Postfix services using, “sudo systemctl restart postfix”.
2.0 Dovecot Installation & Configuration
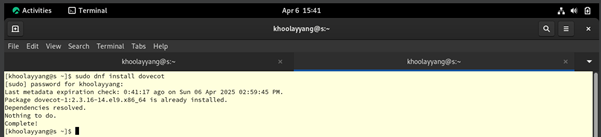
Figure 4.0.1 – Install Dovecot on the Rocky Linux (Email Server)
To install Dovecot, we need to use the command “sudo dnf install dovecot” in the Terminal on the Rocky Linux (Email Server).
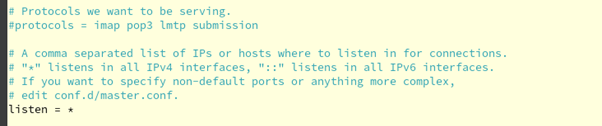
Figure 4.0.2 – Configure Dovecot “dovecot.conf” on the Rocky Linux (Email Server)
First, to configure we need to use “sudo nano /etc/dovecot/dovecot.conf” on your terminal. Then, in your nano editor move to line 30 and change “listen = *, ::” into “listen = *” as we only using IPv4.
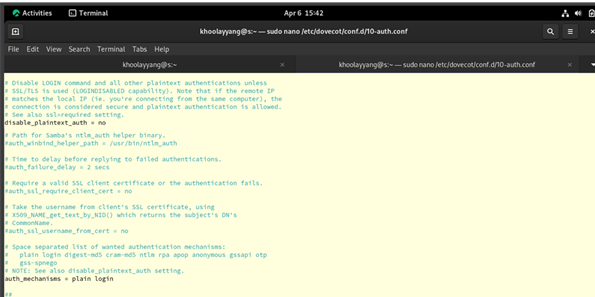
Figure 4.0.3 – Configure Dovecot “10-auth.conf” on the Rocky Linux (Email Server)
Then, to configure the Dovecot “10-auth.conf” file, we need to use “sudo nano /etc/dovecot/conf.d/10-auth.conf” on your terminal. Then, in the nano editor move to line 10 and set the “disable_plaintext_auth” as no to allow plaintext authentication. Then, add “auth_mechanisms = plain login”. This would allow the send the username and password in plain text while we are using SSL/TLS.

Figure 4.0.4 – Configure Dovecot “10-mail.conf” on the Rocky Linux (Email Server)
Next, to configure the Dovecot “10-mail.conf” file, we need to use “sudo nano /etc/dovecot/conf.d/10-mail.conf” on your terminal. In the nano editor, move to line 30 and uncomment the “mail_location = maildir:~/Maildir”. Use CTRL + X + Y to save the file and exit.

Figure 4.0.5 – Configure Dovecot “10-master.conf” on the Rocky Linux (Email Server)
Next, to configure the Dovecot “10-master.conf” file, we need to use “sudo nano /etc/dovecot/conf.d/10-master.conf” on your terminal. In the nano editor, move the line 107 to 109, uncomment the “Postfix smtp-auth” and configure it as:
|
unix_listener /var/spool/postfix/private/auth { mode = 0666 user = postfix group = postfix } |
By doing this, is to allow Postfix to use the SMTP using the Unix Socket and sets up Dovecot as the SASL provider for Postfix.
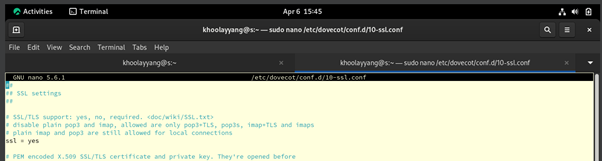
Figure 4.0.6 – Configure Dovecot “10-ssl.conf” on the Rocky Linux (Email Server)
To enable the SSL, we need to edit the Dovecot “10-ssl.conf” file. You need to use “sudo nano /etc/dovecot/conf.d/10-ssl.conf”, then in the nano editor go to the line 8 and change the from “SSL = *” to “SSL = yes”.
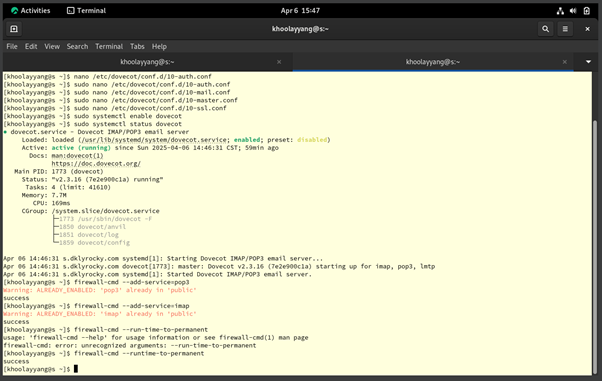
Figure 4.0.7 – Enable Dovecot and Allow POP3 & IMAP port on the Rocky Linux (Email Server)
Finally, to start Dovecot, use “sudo systemctl enable --now dovecot” and use “sudo systemctl status dovecot” to check the health of the Dovecot services. This is to check the possible errors in Dovecot. Then, we need to allow the POP3 and IMAP ports, which are ports 110 and 143, by using the command “sudo firewall-cmd --add-service={pop3,imap}” and allow it to run permanently by “sudo firewall-cmd --runtime-to-permanent”
3.0 SSL Configuration

Figure 5.0.1 – Install OpenSSL on the Rocky Linux (Email Server)
First, before we generate or request an SSL certificate, you need to install OpenSSL by using the command “sudo dnf install openssl -y”. It would require you to fill in your root password to gain permission for the installations.

Figure 5.0.2 – Generate a OpenSSL Cert for myFQDN on the Rocky Linux (Email Server)
To generate a self-signed certificate with RSA 2048-bit and validate for 365 days cert for my FQDN domain using OpenSSL, we can use the command below:
|
openssl req -x509 -nodes -days 365 -newkey rsa:2048 \ -keyout /etc/pki/tls/private/s.dklyrocky.com.key \ -out /etc/pki/tls/certs/s.dklyrocky.com.crt \ -subj "/CN=s.dklyrocky.com" |
It will automatically generate the Private Key and Public Key and save them to the files that we wanted.
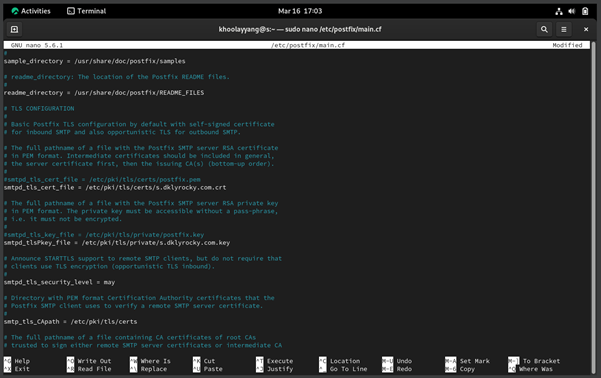
Figure 5.0.3 – Configure the SMTPD SSL in the Postfix “main.cf” file on the Rocky Linux (Email Server)
To configure or edit the Postfix “main.cf” file, we need to use “sudo nano /etc/postfix/main.cf” in the terminal. Then, go to line 710 and add “smtpd_tls_cert_file = /etc/pki/tls/certs/s.dklyrocky.com.crt” and then on line 716 add “smtpd_tls_key_file = /etc/pki/tls/private/s.dklyrocky.com.key”. Once added, save it by pressing CTRL + X + Y + Enter.

Figure 5.0.4 – Configure the SSL in the Dovecot “10-ssl.conf” file on the Rocky Linux (Email Server)
After that, we need to configure or add the SSL cert and key into the Dovecot “10-ssl.conf” file. We need to use “sudo nano /etc/dovecot/conf.d/10-ssl.conf” to open the file in the nano editor. Then, on line 14 and 15 add the path of my cert and key that was generated using OpenSSL, and replace it:
|
ssl_cert = ssl_key = |
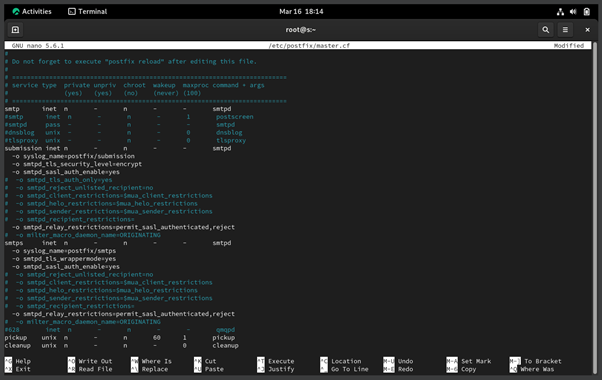
Figure 5.0.5 – Configure the SMTPD in the Postfix “master.conf” file on the Rocky Linux (Email Server)
In this part, we need to configure postfix to let it support the secure SMTP submission and SMTPS, which is SMTP over SSL. To configure this, we need to use “sudo nano /etc/postfix/master.cf” in your terminal and in the nano editor go to lines 17,18, and 20 to uncomment the “-o syslog_name=postfix/submission”, “-o smtpd_tls_security_level=encrypt” and “-o smtpd_sasl_auth_enable=yes”. After that, you need to uncomment from the lines 29 to 32:
|
smtps inet n - n - - smtpd -o syslog_name=postfix/smtps -o smtpd_tls_wrappermode=yes -o smtpd_sasl_auth_enable=yes |
This is to resolve the error you're getting as shown in Figure 5.0.6
below, when u send the email:
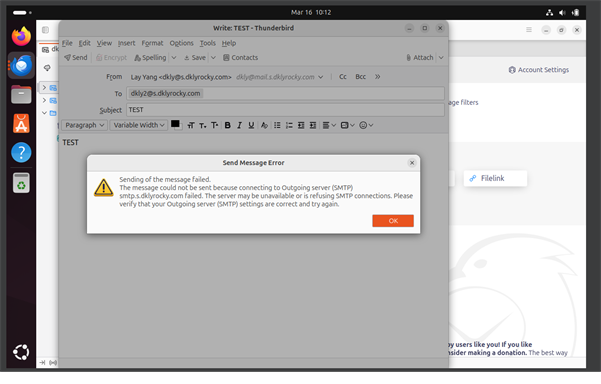
Figure 5.0.6 – Error Popup while Sending Message (failed to connect to Outgoing SMTP Server) on Thunderbird installed on Ubuntu (Client).

Figure 5.0.7 – Restart the Postfix & Dovecot Services and Allow SMTP, SMTPS, IMAP, IMAPS, POP3s ports on the Rocky Linux (Email Server)
Last, after configuring the SSL, you need to restart the Postfix and Dovecot services by using “sudo systemctl restart postfix dovecot” and allow the SMTP, SMTPS, IMAP, IMAPS, POP3, POP3s ports in the firewall by using the command “firewall-cmd --add-service={smtp-submission, smtps, pop3s, imaps}” in the Terminal of Rocky Linux.
4.0 Mozilla Thunderbird Set Up & Configuration
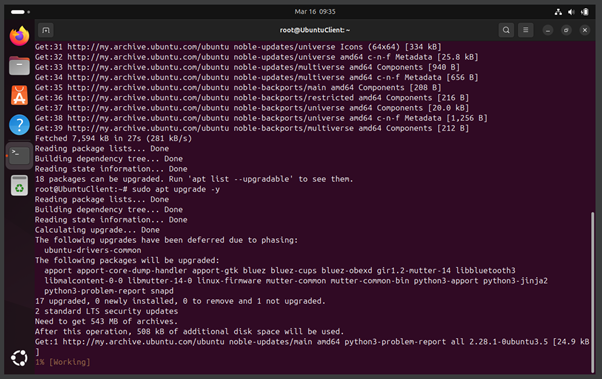
Figure 6.0.1 – Update the Ubuntu Package
Before we start installing the Mozilla Thunderbird, we need to run the “sudo apt update -y && upgrade -y” on the terminal to ensure that the Ubuntu repository and packages are up to date.
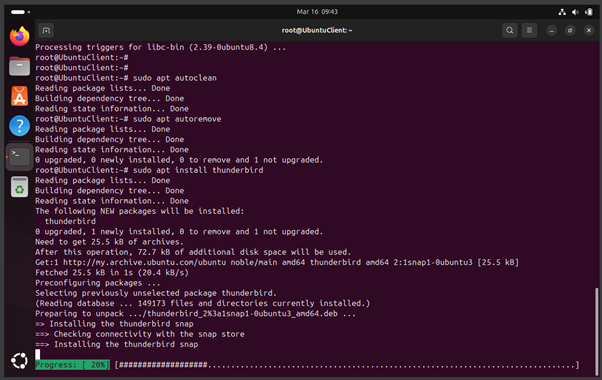
Figure 6.0.2 – Install Mozilla Thunderbird on Ubuntu (client)
To install the Mozilla Thunderbird, we need to run the “sudo apt install thunderbird -y” on the terminal, and it will start downloading the package and start installing. Just be patient, it won't take long just a 30 seconds depends on your internet connection and device performance.

Figure 6.0.3 – Configure Email on the Mozilla Thunderbird on Ubuntu (client)
After installing, double-click the Mozilla Thunderbird icon on the top left to execute. Then, it will pop up this page. You need to fill in your name, email address, and password that you had created on your Rocky Linux (Email Server). Then, click continue.

Figure 6.0.4 – Configure SMTPs on the Mozilla Thunderbird on Ubuntu (client)
It will auto-detect the configuration from the email server, then click on the Manual Configurations to change the Port of Incoming Server and Outgoing Server to 143 and 587. These are the ports used for SSL. Then, click Re-Test and Done. If there are no errors, it will show “Account Successfully created” as shown in Figure 6.0.5 below:

Figure 6.0.5 – Configure SMTPs on the Mozilla Thunderbird on Ubuntu (client)
5.0 Troubleshooting & Test Email

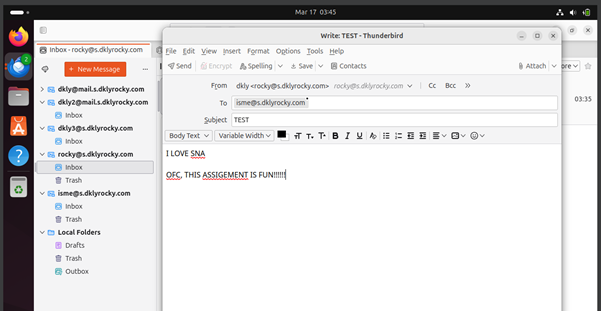
Figure 7.0.1 – Try sending email using Mozilla Thunderbird on Ubuntu (client) | TEST 1
I know you can’t wait to get your hands dirty, right? Let’s try to send an email between dkly and dkly2 using Mozilla Thunderbird. As you can see in Figure 7.0.1, I filled in the emails and subject and body of email messages. (OFC, I live SNA class is FUN!!) Then, click the send button, but unfortunately, it failed to send with the error shown in Figure 7.0.2.

Figure 7.0.2 – Failed sending email using Mozilla Thunderbird on Ubuntu (client) | TEST 1
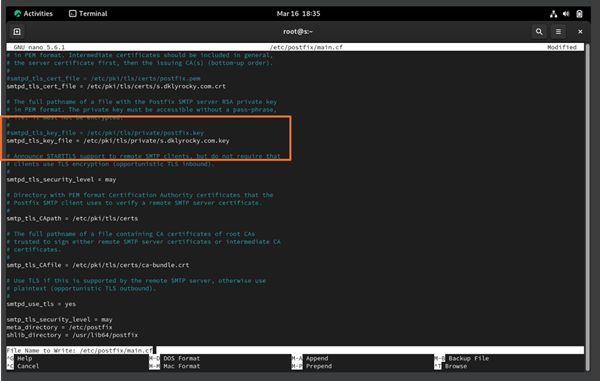
Figure 7.0.3 – Solutions to Fix the Failed sending email using Mozilla Thunderbird on Ubuntu (client) | TEST 1
After I had checked all my configuration, I found that I made a typo in the Postfix “main.cf” configuration file on line 716, as shown in Figure 5.0.3. The correct should be “smtpd_tls_key_file = /etc/pki/tls/private/s.dklyrocky.com.key”.
 Figure
7.0.4 – Try sending email using Mozilla Thunderbird on Ubuntu (client) | TEST 2
Figure
7.0.4 – Try sending email using Mozilla Thunderbird on Ubuntu (client) | TEST 2
After fixing the error previously, let’s try to send a new email again between [email protected] and [email protected]. I have filled in the subject and email body text as shown in Figure 7.0.4 and clicked on the send button.

Finally, as you can see in Figure 7.0.5, the email was able to be sent out to [email protected] and was received well.
6.0 Red Hat Academy Certificate of Attendance

Figure 8.0.1 – Red Hat Academy Certificate I (RH124) issued by Red Hat
Verification link: https://www.credly.com/badges/3d811165-beac-4a89-b78b-663663ba0209/
7.0 Conclusion
In conclusion, Rocky OS is a Linux-based open-source operating system developed by Gregory Kurtzer, and Ubuntu OS was established by Mark Shuttleworth and published in 2004 by Canonical Ltd. In this assignment, I had successfully set up a fully functional email system using Postfix as the Mail Transfer Agent (MTA) to send and receive emails. I also used Dovecot as the SMTP MAP/POP3 server, which is primarily focused on security and it allows the users to send and receive emails using email clients such as Mozilla Thunderbird. Finally, to improve the overall security while sending and receiving email, I had also configured self-signed Secure Sockets Layer (SSL) using OpenSSL, which can ensure privacy, security and the integrity of communication.
8.0 References
Team, S. M. (2025, February 19). Which SMTP Port to Use? Understanding ports 25, 465, & 587. Mailgun. https://www.mailgun.com/blog/email/which-smtp-port-understanding-ports-25-465-587/
What SMTP port should be used? Port 25 or 587? | Cloudflare. (n.d.). https://www.cloudflare.com/learning/email-security/smtp-port-25-587/
Amy. (2025, April 1). Understanding SMTP ports 25, 465, 587 and 2525. MailerSend. https://www.mailersend.com/blog/smtp-ports
Postfix documentation. (n.d.). https://www.postfix.org/documentation.html
Postfix Basic Configuration. (n.d.). https://www.postfix.org/BASIC_CONFIGURATION_README.html#myhostname
Postfix TLS Support. (n.d.). https://www.postfix.org/TLS_README.html
Learn to install and configure Postfix with STARTTLS on Oracle Linux. (2024, March 5). Oracle Help Center. https://docs.oracle.com/en/learn/oracle-linux-postfix-starttls/
What is Dovecot? Hosting Wikipedia. (2021, April 12). Plesk. https://www.plesk.com/wiki/dovecot/
Home | Dovecot CE. (2025, March 18). https://doc.dovecot.org/2.4.1/
Chapter 9. Configuring and maintaining a Dovecot IMAP and POP3 server | Red Hat Product Documentation. (n.d.). https://docs.redhat.com/en/documentation/red_hat_enterprise_linux/8/html/deploying_different_types_of_servers/configuring-and-maintaining-a-dovecot-imap-and-pop3-server_deploying-different-types-of-servers#configuring-tls-encryption-on-a-dovecot-server_setting-up-a-dovecot-server-with-pam-authentication
Chapter 8. Deploying and configuring a Postfix SMTP server | Red Hat Product Documentation. (n.d.). https://docs.redhat.com/en/documentation/red_hat_enterprise_linux/8/html/deploying_different_types_of_servers/assembly_mail-transport-agent_deploying-different-types-of-servers
Apache: CSR & SSL Installation (OpenSSL). (n.d.). https://www.digicert.com/kb/csr-ssl-installation/apache-openssl.htm
Anicas, M. (2021, October 13). OpenSSL Essentials: Working with SSL Certificates, Private Keys and CSRs. DigitalOcean. https://www.digitalocean.com/community/tutorials/openssl-essentials-working-with-ssl-certificates-private-keys-and-csrs
Generating keys using OpenSSL. (n.d.). https://developers.yubico.com/PIV/Guides/Generating_keys_using_OpenSSL.html
OpenSSL Quick Reference Guide. (n.d.). https://knowledge.digicert.com/general-information/openssl-quick-reference-guide
IBM Robotic Process Automation 23.0.X. (2023, September 16). https://www.ibm.com/docs/en/rpa/23.0?topic=keys-generating-private-public-key-pair
Chapter 2. Creating RSA public-private key pair | Red Hat Product Documentation. (n.d.). https://docs.redhat.com/en/documentation/red_hat_openshift_data_foundation_managed_service/2022-q2/html/getting_started_with_red_hat_openshift_data_foundation_managed_service/proc_creating-the-rsa-public-private-key-pair_deploy-models
openssl-genpkey - OpenSSL Documentation. (n.d.). https://docs.openssl.org/3.1/man1/openssl-genpkey/
Z.Yi. (2024, September 8). How to generate OpenSSL RSA key pair on Linux Cloud Server - IPSERVERONE. IPSERVERONE. https://www.ipserverone.info/knowledge-base/how-to-generate-openssl-rsa-key-pair-on-linux/